Live Reset For UI Tests
Overview
A typical test case involves using our test subject from a clean (or perhaps some pre-determined) state, perform some action(s) and verify some state. UI tests should follow this pattern too. Each test case should re-launch the app and reset it prior to conducting the test to ensure we have deterministic test cases.
Resetting or pre-configuring the app on launch is easily achieved by specifying some launchArguments and launchEnvironment on XCUIApplication from within the test target. John Sundell covered examples of how this can be achieved in his UIKonf talk about the Magic of UI testing which is worth a watch!
Re-launching the app each time however has one small snag! This re-launch business takes up time, ~6 Seconds per re-launch! This figure is for a dummy app, the actual launch time could be worse for larger applications. That’s a whole minute for 10 test cases, ten minutes for 100!
The Short Version
During UI testing, introducing a mechanism to reset our app while it’s running will give us the best of both worlds, a clean slate each time and a faster transition to subsequent tests!
Here’s a demo of how such a technique compares:
The following sections will cover some of ways this reset mechanism can be implemented, ranging from simple to slightly more complex ones.
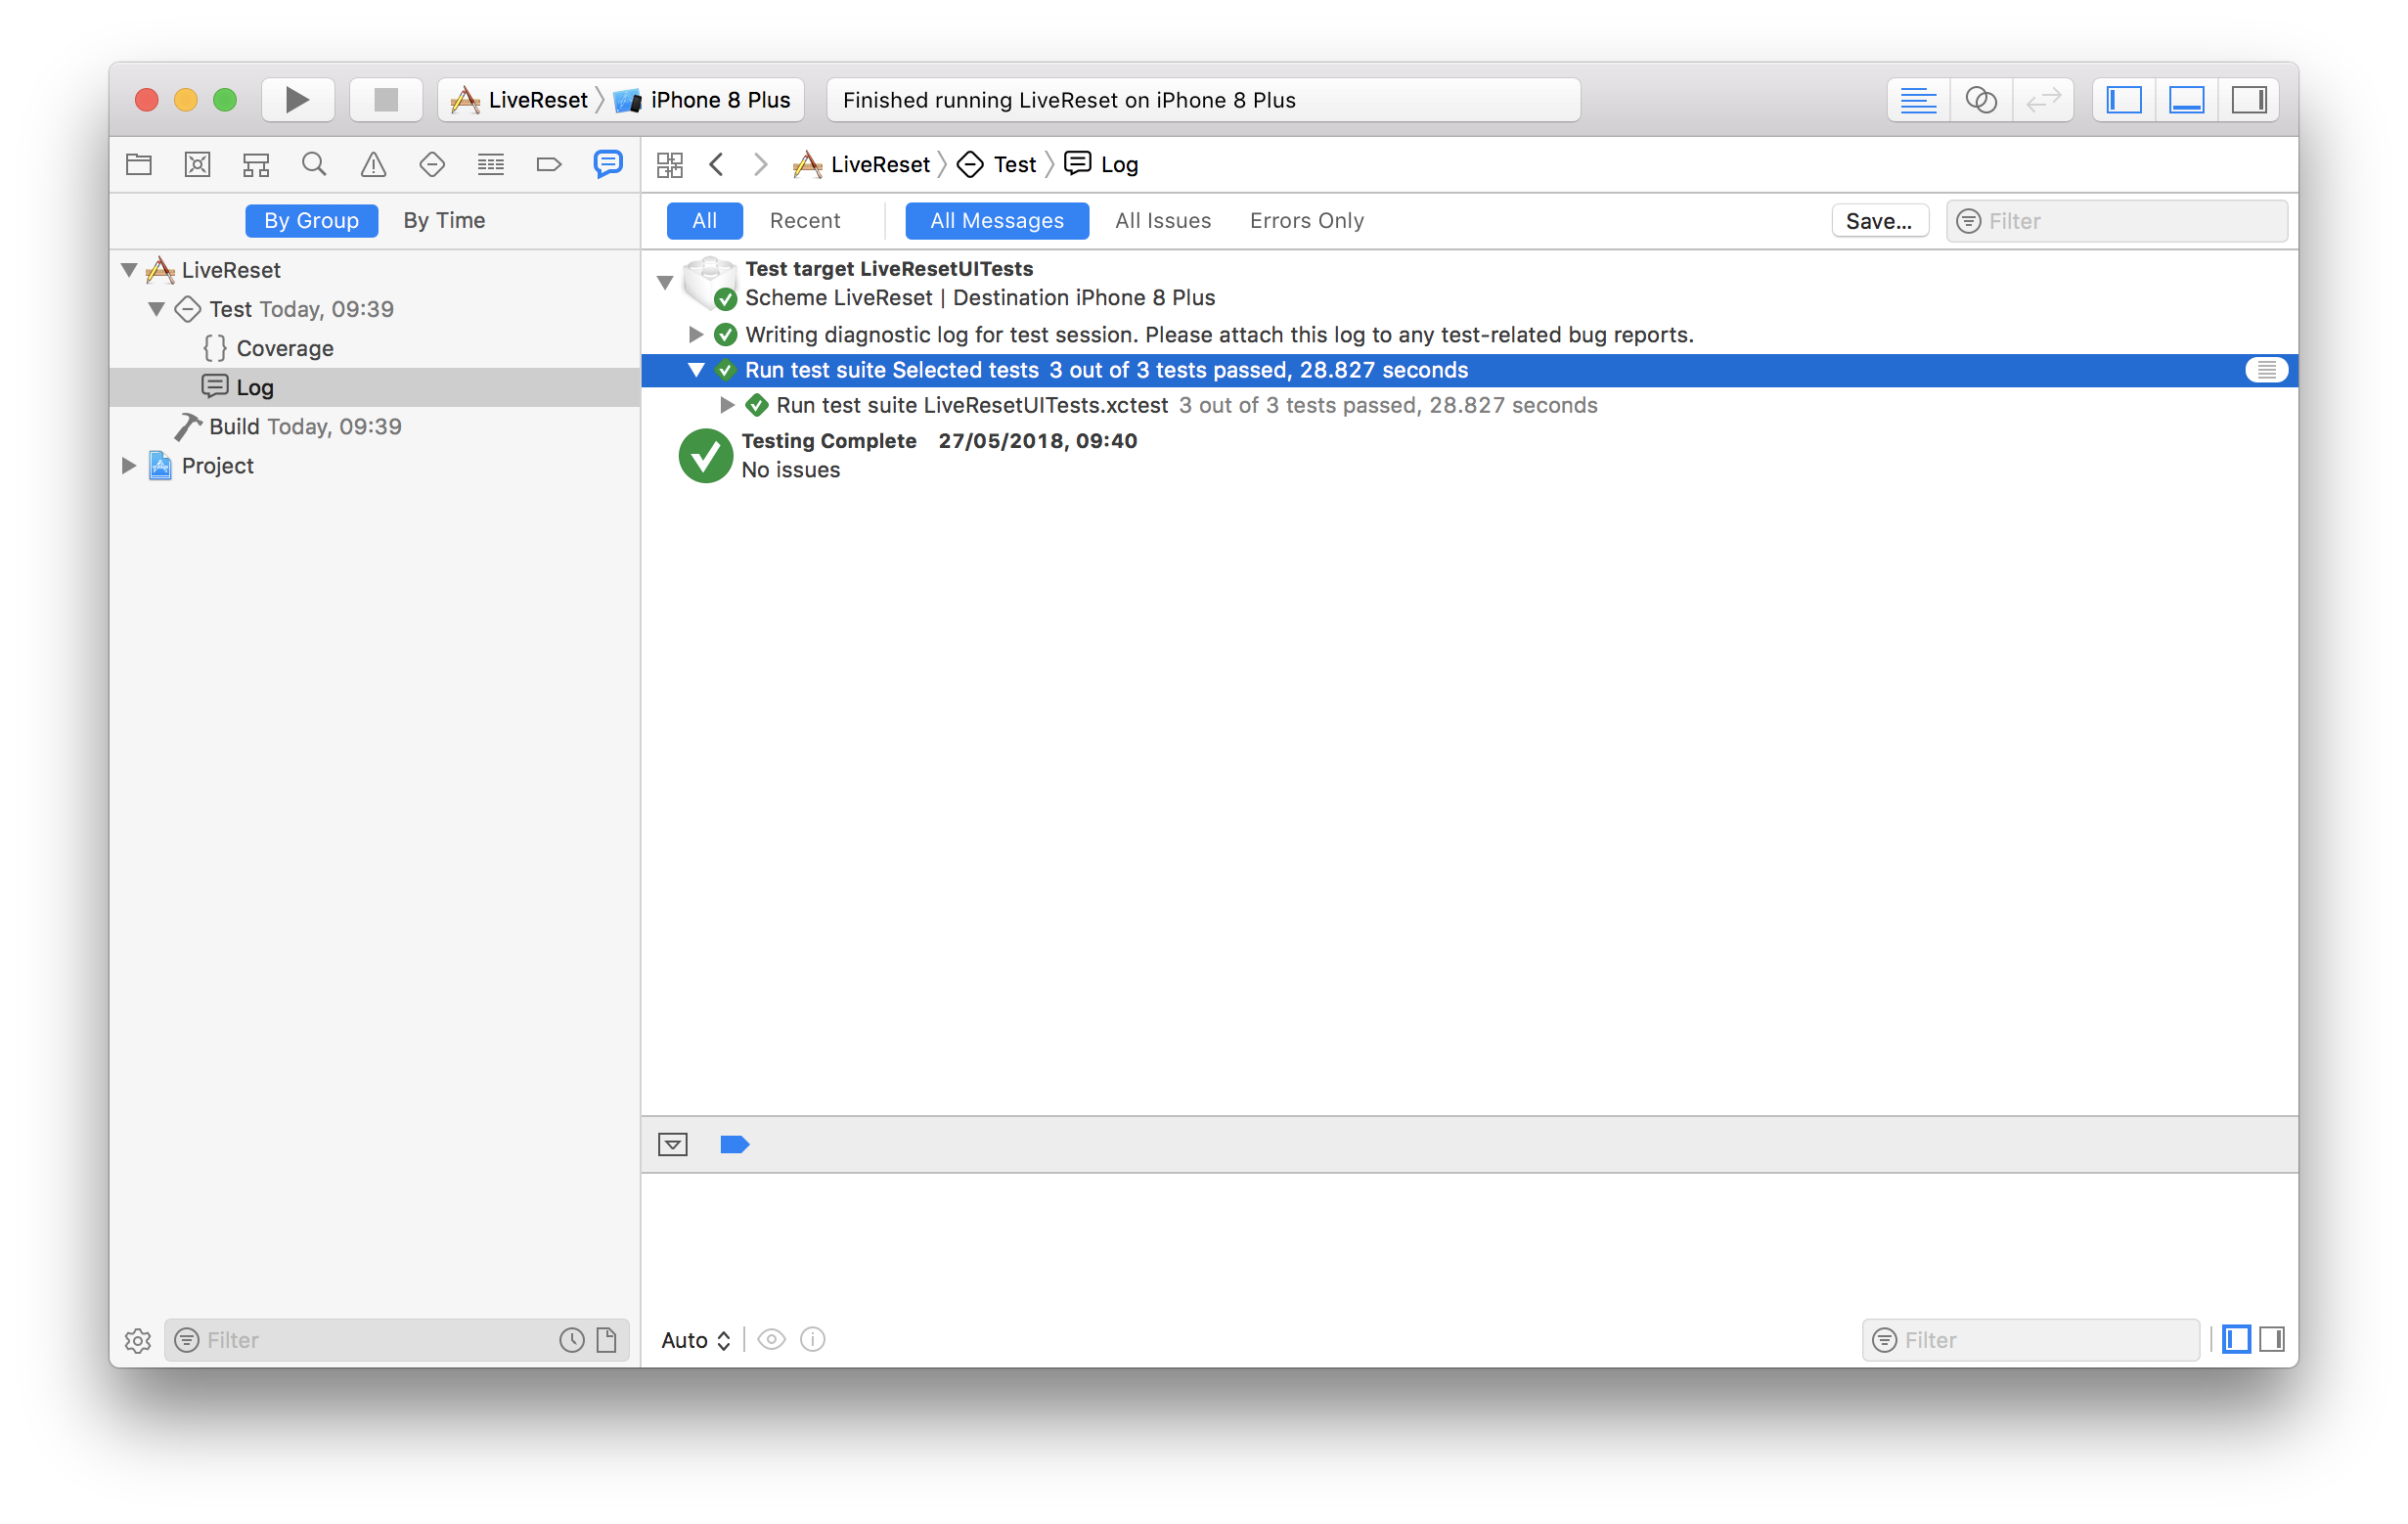
How much time is wasted?
In the intro I mentioned the 6 seconds figure, that’s what I measured for a sample app. If you’re curious how much time is wasted for your test cases you could inspect the raw logs in Xcode. Those can be found by navigating to the Report Navigator tab (⌘+9) and selecting Log. From there you could either expand the log in Xcode or copy it out to a file.
Note: to avoid copying out duplicate log lines, copy the section that starts with Run test suite...
The log lines look something like this:
t =    14.20s Open net.matrixprojects.trials.LiveReset
t =    14.23s     Launch net.matrixprojects.trials.LiveReset
t =    14.23s         Terminate net.matrixprojects.trials.LiveReset:37874
t =    17.76s         Wait for net.matrixprojects.trials.LiveReset to idle
t =    20.87s Tap "List" Button
t =    20.87s     Wait for net.matrixprojects.trials.LiveReset to idle
t =    20.91s     Find the "List" Button
t =    21.05s     Synthesize event
t =    21.15s     Wait for net.matrixprojects.trials.LiveReset to idle
In this example, the launch of the app takes place between Open net.matrixprojects.trials.LiveReset log line and the first action Tap "List" Button.
Bashing some python and regex together, we could work out the total launch time taken:
import re

log = open("/path/to/raw-ui-test.log", "r").read()
regex = "=\s*([0-9]+\.[0-9][0-9])s Open .*\n" \
        ".*Launch.*\n" \
        ".*Terminate.*\n" \
        ".*Wait.*\n" \
        ".*=\s*([0-9]+\.[0-9][0-9])s"
results = re.findall(regex, log)

total_launch_time = 0
for r in results:
    launch_time = float(r[1]) - float(r[0])
    total_launch_time = total_launch_time + launch_time

print "%.2f Seconds" % total_launch_time
Live Reset
To pull this off, at a high level here’s what we’ll need:
- Gracefully handle a “reset” event while the application is running
- Build out a mechanism to get notified about reset events
- Trigger a reset from the UI tests instead of re-launching the app for each test case
The UI test runner (where our UI test code is running) is actually it’s own app/process. This means we can’t simply call out to our application classes directly to trigger our reset logic. Sadly there aren’t any options available out of the box when using XCTest to overcome this limitation, so we’ll need to get a bit creative to find some solutions.
Handling a live reset
We’ll need to ensure the view and data states are both reset while the application is running. By view state here I mean the view hierarchies. A simple way to achieve this is to re-create the window from scratch when we need to reset:
extension AppDelegate {
    func reset() {
        tearDown()
        window = createWindow()
    }

    func tearDown() {
        window?.rootViewController = nil
        window?.isHidden = true
        window = nil
    }

    func createWindow() -> UIWindow {
        let storyboard = UIStoryboard(name: "Main", bundle: nil)

        let window = UIWindow(frame: UIScreen.main.bounds)
        window.rootViewController = storyboard.instantiateInitialViewController()
        window.makeKeyAndVisible()

        return window
    }
}
Regarding the data state, it’s just a matter of re-creating your models / dependencies (e.g. Networking, storage, business logic models, etc…). This will of course vary app by app, for the sake of this blog post, I’ll be using a class called AppDependencies to act as the conglomerate of models / dependencies the app needs to function.
extension AppDelegate {
    func reset() {
        tearDown()
        appDependencies = createAppDependencies()
        window = createWindow()
    }
    // ...
}
We can then hook this all up our didFinishLaunchingWithOptions method:
@UIApplicationMain
class AppDelegate: UIResponder, UIApplicationDelegate {
var window: UIWindow?
var appDependencies: AppDependencies?
var resetNotifier: ResetNotifier?
func application(_ application: UIApplication, didFinishLaunchingWithOptions launchOptions: [UIApplicationLaunchOptionsKey: Any]?) -> Bool {
setup()
return true
}
// ...
}
extension AppDelegate {
func setup() {
reset()
}
// ...
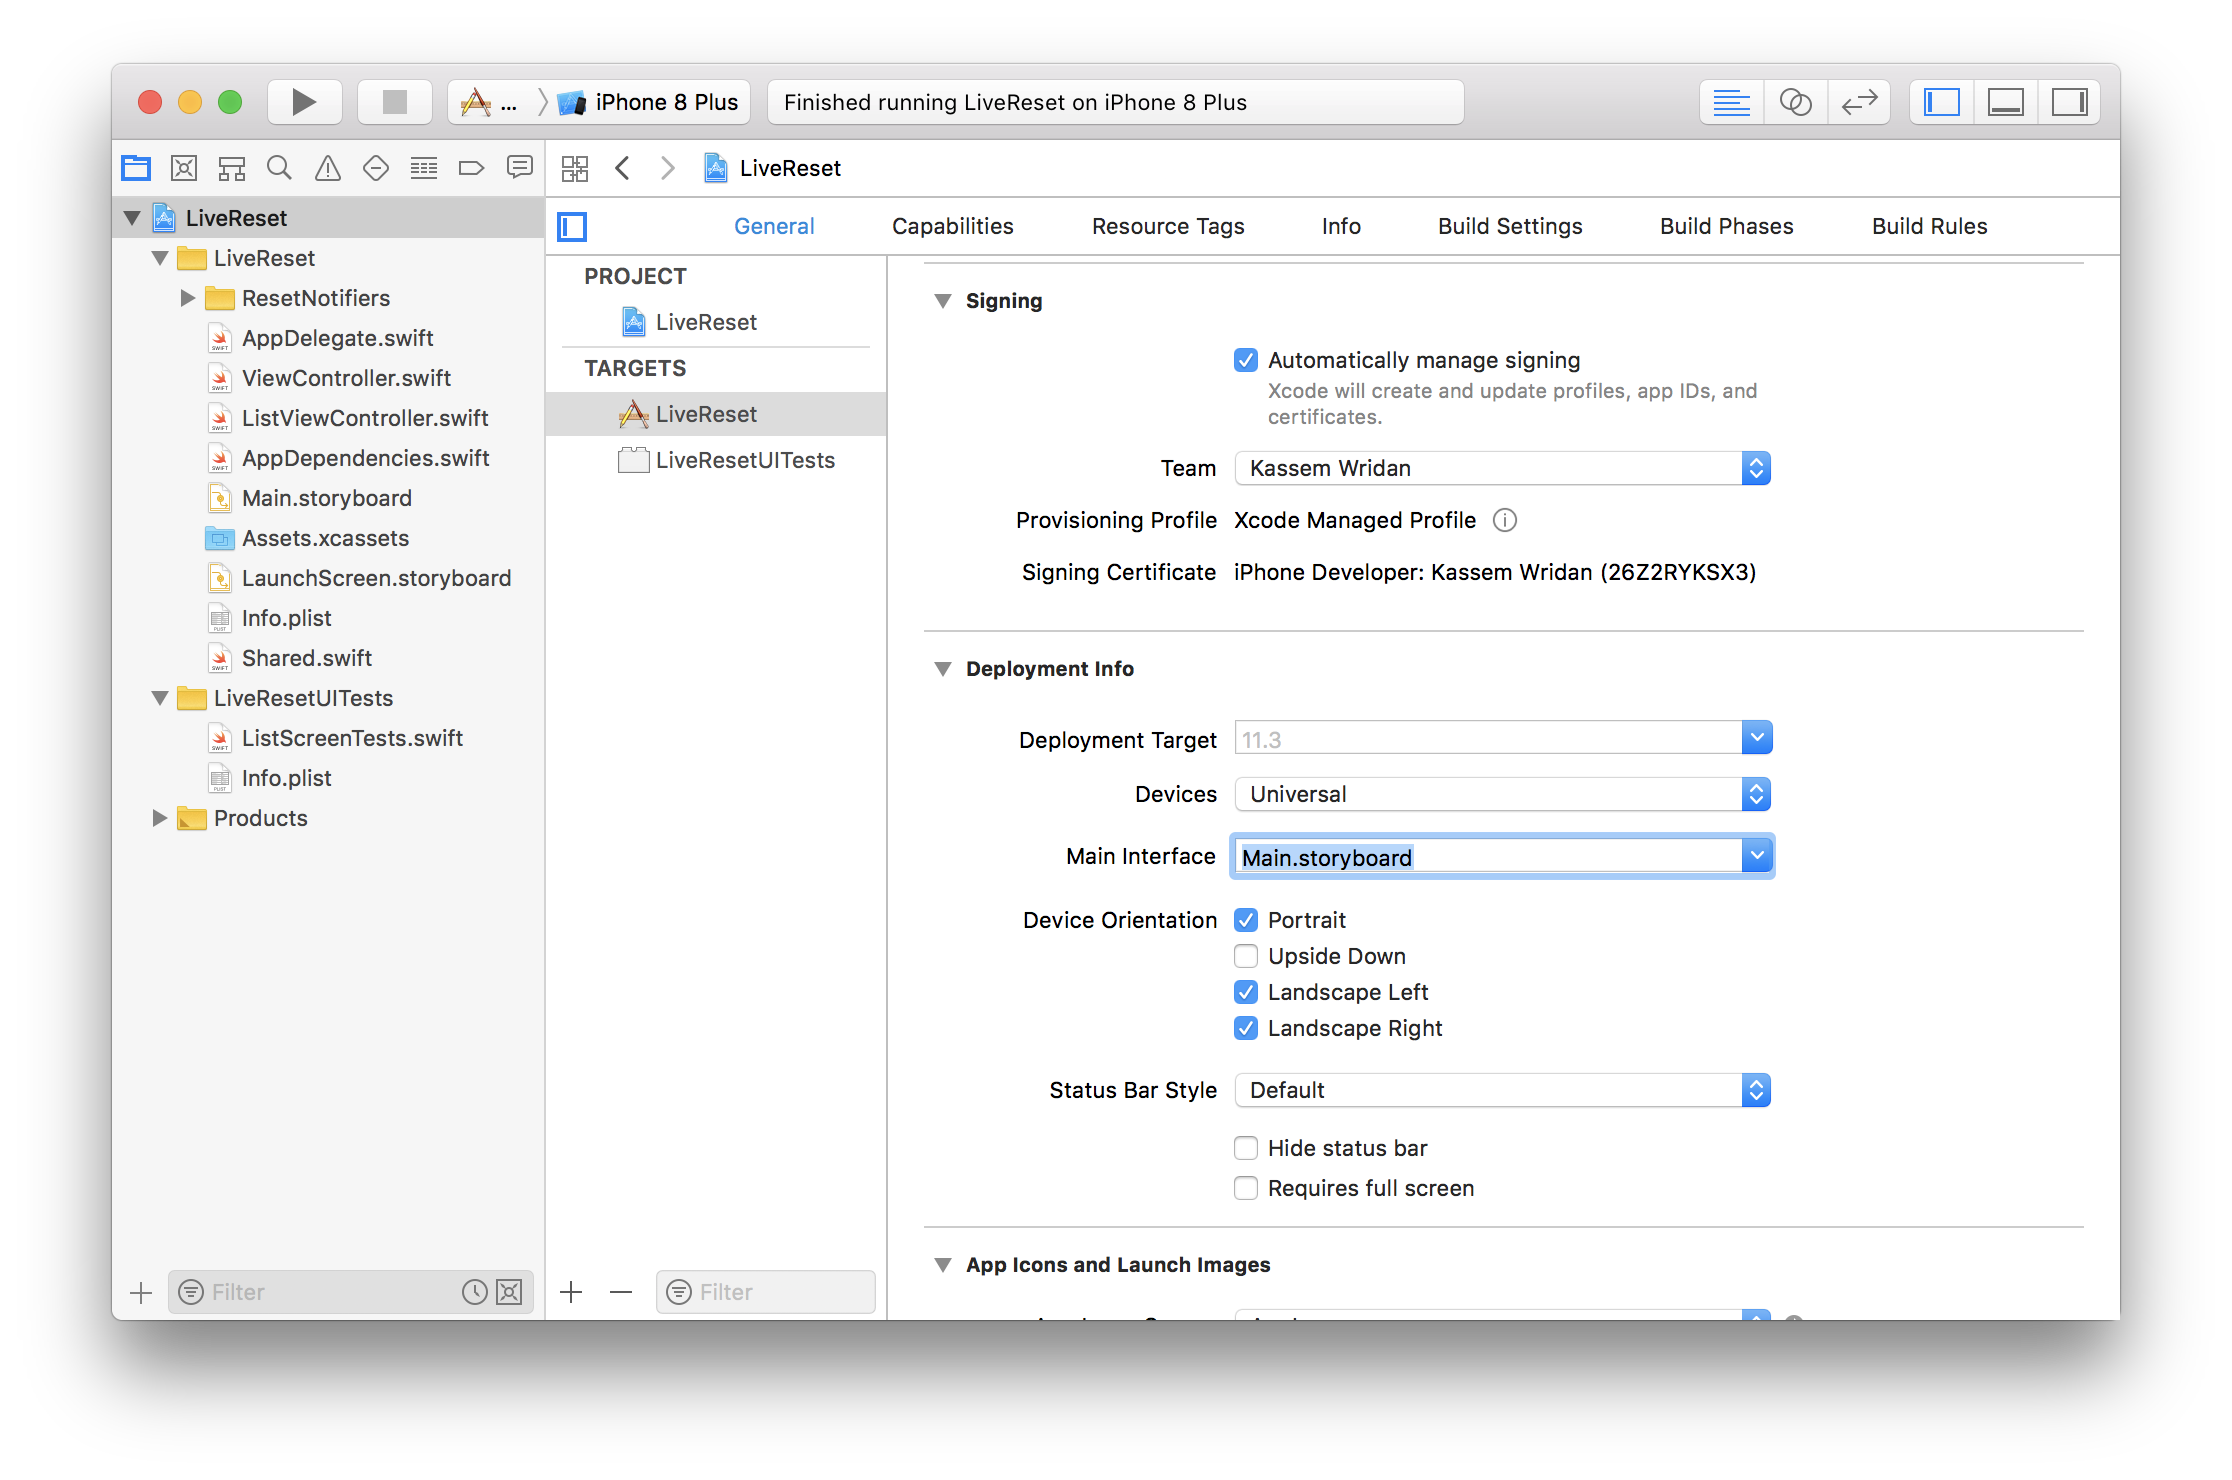
}Note: In the event the main interface setting is specified in the target setting, a UIWindow will automatically be created and it’s rootViewController will be set to the initial view controller of the specified Storyboard file. To avoid creating a redundant window and seeing we’re now manually creating and setting it up, we could opt out of the automatic behavior by simply clearing that setting.
Reset Notifier
As we explore the different techniques of triggering a live reset, it’s helpful to model our “Reset Notifier” as a protocol:
// ResetNotifier.swift

protocol ResetNotifier {
    func add(handler: @escaping () -> Void)
}
extension AppDelegate {
// ...
func setupResetNotifier() {
resetNotifier = createResetNotifier()
resetNotifier?.add { [weak self] in
self?.reset()
}
}
// ...
}This helps keep our AppDelegate clean and isolate our reset mechanism in separate classes. This will also allow us to swap implementations as needed.
Reset Trigger
To trigger the yet to be determined “reset” mechanism from our UI test target we’ll need to tweak our test cases to call out to a custom reset() method instead of the typical launch() method:
extension XCUIApplication {
    func reset() {
        if state != .runningForeground {
            launch()
        } else {
            resetAction()
        }
    }
}
In the event the application isn’t running, we will still need to launch it first, but to hide that concern from the individual test cases we can work it out within our reset() method by checking the current XCUIApplication.State.
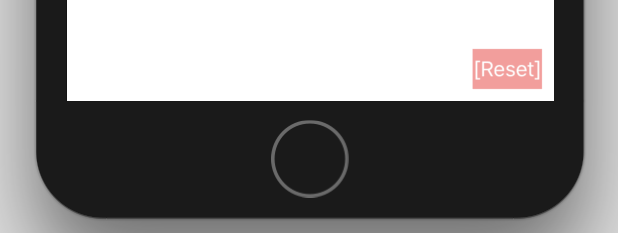
1) Floating Button Reset Notifier
The idea here is quite simple, when launching the app under test, we could inject a small floating reset button in our main UIWindow.
class FloatingButtonResetNotifier: ResetNotifier {
    var handlers: [() -> Void] = []
    var buttonTargetAction = TargetAction()

    init(window: UIWindow) {
        let button = createButton()
        embed(button: button, within: window)
        setupTapAction(for: button)
    }

    func add(handler: @escaping () -> Void) {
        handlers.append(handler)
    }

    func handleTap() {
        handlers.forEach { $0() }
    }

    func createButton() -> UIButton {
        let button = UIButton(type: .custom)
        button.setTitle("[Reset]", for: .normal)
        button.backgroundColor = UIColor.red.withAlphaComponent(0.4)
        button.accessibilityIdentifier = Reset.Button.accessibilityIdentifier
        return button
    }

    func setupTapAction(for button: UIButton) {
        buttonTargetAction.onTap = { [weak self] in
            self?.handleTap()
        }

        button.addTarget(buttonTargetAction,
                         action: #selector(TargetAction.didTap(_:)),
                         for: .touchUpInside)
    }

    func embed(button: UIButton, within window: UIWindow) {
        window.addSubview(button)
        button.translatesAutoresizingMaskIntoConstraints = false
        NSLayoutConstraint.activate([
            button.trailingAnchor.constraint(equalTo: window.safeAreaLayoutGuide.trailingAnchor, constant: -10),
            button.bottomAnchor.constraint(equalTo: window.safeAreaLayoutGuide.bottomAnchor, constant: -10),
        ])
    }

    class TargetAction: NSObject {
        var onTap: (() -> Void)?

        @objc func didTap(_ sender: UIButton) {
            onTap?()
        }
    }
}
Due to this notifier’s dependency on the current UIWindow which we re-create each time, we’ll also need to re-create the reset notifier alongside it:
extension AppDelegate {
    func reset()  {
        tearDown()
        appDependencies = createAppDependencies()
        window = createWindow()
        setupResetNotifier()
    }
}
To trigger a reset from the UI tests, we simply tap that button:
extension XCUIApplication {
    func resetAction() {
        buttons[Reset.Button.accessibilityIdentifier].tap()
    }
}
Pros:
- Simple to implement and manually test
Cons:
- Quite intrusive, and could obstruct other views which may need to be tested
- It isn’t possible to pass in new
launchArgumentsorlaunchEnvironmentwhen resetting for each test case
2) Gesture Reset Notifier
Instead of having a visible view this time, we could perhaps introduce a special gesture on the main window which triggers our reset.
class GestureBasedResetNotifier: ResetNotifier {
    var gestureHandler = ResetGestureHandler()
    var handlers: [() -> Void] = []

    init(window: UIWindow) {
        let gesture = createTapGesture(with: gestureHandler)
        setup(gesture: gesture, within: window)
        setupTriggerAction(for: gestureHandler)
    }

    func add(handler: @escaping () -> Void) {
        handlers.append(handler)
    }

    func didTrigger() {
        let handlers = self.handlers
        handlers.forEach { $0() }
    }

    func setupTriggerAction(for gestureHandler: ResetGestureHandler) {
        gestureHandler.onTrigger = { [weak self] in
            self?.didTrigger()
        }
    }

    func setup(gesture: UIGestureRecognizer, within window: UIWindow) {
        window.addGestureRecognizer(gesture)
        window.accessibilityIdentifier = Reset.Gesture.hostWindowAccessibilityIdentifier
    }

    func createTapGesture(with gestureHandler: ResetGestureHandler) -> UITapGestureRecognizer {
        let resetGesture = UITapGestureRecognizer(target: gestureHandler, action: #selector(ResetGestureHandler.didTrigger(_:)))
        resetGesture.numberOfTapsRequired = Reset.Gesture.numberOfTaps
        resetGesture.numberOfTouchesRequired = Reset.Gesture.numberOfTouches
        resetGesture.delaysTouchesBegan = false
        resetGesture.delaysTouchesEnded = false
        return resetGesture
    }

    class ResetGestureHandler: NSObject {
        var onTrigger: (() -> Void)?

        @objc func didTrigger(_ gestureRecognizer: UIGestureRecognizer) {
            guard gestureRecognizer.state == .recognized else {
                return
            }
            onTrigger?()
        }
    }
}
Similarly to the floating button, due to this notifier’s dependency on the current UIWindow, we’ll also need to re-create whenever we re-create the window:
extension AppDelegate {
    func reset()  {
        tearDown()
        appDependencies = createAppDependencies()
        window = createWindow()
        setupResetNotifier()
    }
}
To trigger the reset, we can attempt to perform the gesture, for example if it was a multiple tap based gesture:
extension  XCUIApplication {
    func resetAction() {
        let window = windows[Reset.Gesture.hostWindowAccessibilityIdentifier]
        window.tap(withNumberOfTaps: Reset.Gesture.numberOfTaps,
                   numberOfTouches: Reset.Gesture.numberOfTouches)
    }
}
Pros:
- Not as obstructive as a floating button
Cons:
- UI tests aren’t able to reliably trigger complex gestures (e.g. with multiple touches)
- It’s easy to accidentally trigger the reset gesture during the test
- As with the floating button, we aren’t able to pass new
launchArgumentsorlaunchEnvironmentwhen resetting
3) Darwin Notification Reset Notifier
You might be surprised to learn there’s actually a low-level API available within iOS that actually allows cross app communication! DarwinNotifyCenter. All-be-it a simple trigger without any means to pass data, for the purposes of a reset, it does the trick.
I’ve actually covered this in a previous post if you’re interested in details. Be warned it’s quite an old post and with many of the code snippets written in Swift 2 syntax! The good news is that the associated github project was recently updated to Swift 4.
In this example, I’ll be using the “beeper” class (I know, naming is hard …) from github. This class will need to be part of both the main application and UI test targets.
class DarwinNotifyCenterResetNotifier: ResetNotifier {
    var handlers: [() -> Void] = []
    let beeper = DarwinNotificationCenterBeeper()

    init() {
        beeper.registerBeepHandler(identifier: Reset.triggerKey) { [weak self] in
            self?.handlers.forEach { $0() }
        }
    }

    func add(handler: @escaping () -> Void) {
        handlers.append(handler)
    }
}
Since there is no dependency on the window here, the reset notifier only needs to be setup once and does not need to be re-created on every reset.
extension AppDelegate {
    func setup() {
        reset()
        setupResetNotifier()
    }
}
On the UI test side, we could trigger a reset via:
extension XCUIApplication {
    func resetAction() {
        DarwinNotificationCenterBeeper().beep(identifier: Reset.triggerKey)
    }
}
Pros:
- This offers a real trigger mechanism without requiring us to inject elements into our hierarchy that could content with the elements being tested
Cons:
- Like the previous techniques, we still aren’t able to pass new
launchArgumentsorlaunchEnvironmentwhen resetting- That said, if there’s only a handful of settings we need (e.g. “launch with mock data” and “launch with real data”), we could extend our reset notifier to have two distinct reset methods which have their own notification identifiers. This of course will not scale with more settings!
- This API seems too permissive, given how within the iOS eco-system there is heavy sandboxing to prevent apps from interfering with each other, it wouldn’t come as a surprise if this API were to no longer function or be supported in the future.
4) HTTP Request Reset Notifier
This sounds quite extreme but actually unlocks a whole load of possibilities while UI testing. A lightweight http server (e.g. Swifter or Embassy) can be installed within the main application. This server effectively creates another communication channel for us to send custom requests to control the behavior of the app during runtime. Thus enabling us to send a “reset” request from the test target (e.g. http://localhost:8080/reset).
This is not a wildly new concept, see Stubbing Apple’s UI Tests by Tomas Camin and Embedded web server for iOS UI testing by Fang-Pen Lin for examples of what is possible with such a setup beyond a simple “reset”.
For this example, I’ll be using Swifter:
import Swifter

class SwifterResetNotifier: ResetNotifier {
    var handlers: [() -> Void] = []
    let server: HttpServer

    init() {
        server = HttpServer()
        registerPathCallbacks(in: server)
        try! server.start(in_port_t(Reset.HttpServer.port))
    }

    func add(handler: @escaping () -> Void) {
        handlers.append(handler)
    }

    func handleReset() {
        DispatchQueue.main.sync {
            handlers.forEach { $0() }
        }
    }

    func registerPathCallbacks(in server: HttpServer) {
        server[Reset.HttpServer.resetPath] = { [weak self] _ in
            self?.handleReset()
            return .ok(.html("Reset triggered!"))
        }
    }
}
Similarly to the previous notifier, as there is no dependency on the window, the reset notifier only needs to be setup once and does not need be re-created on every reset.
extension AppDelegate {
    func setup() {
        reset()
        setupResetNotifier()
    }
}
Within the UI tests, it’s a matter of sending an http request to trigger a reset:
extension XCUIApplication {
    func resetAction() {
        guard let url = URL(string: Reset.HttpServer.resetUrl) else {
            return
        }

        let e = XCTestExpectation(description: "Reset request should complete")
        URLSession.shared.dataTask(with: url) { _, _, _  in
            e.fulfill()
        }.resume()

        XCTAssertEqual(XCTWaiter.wait(for: [e], timeout: 5.0), .completed)
    }
}
Another option within the same concept is to leverage a dedicated testing framework like SBTUITestTunnel by Tomas Camin. It leverages GCDWebServer under the hood and offers a mechanism to pass data between the UI test target and the main application via Custom Commands.
Pros:
- Http requests are capable of also carrying extra data within the request body. Using some simple
Codablestructures we can easily pass newlaunchArgumentsorlaunchEnvironmentequivalents to the application as part of the reset request. This will not only allow us to reset the app, but also re-configure it on demand based on our test requirements - In addition to resetting the application via our UI tests, we can craft a small html which can have buttons to reset and configure our application to the various states we’re interested in. Effectively we craft our own Hot Reload functionality!
- The html can actually be served from the embeded server when visiting a special link such as
http://localhost:8080/debug
- The html can actually be served from the embeded server when visiting a special link such as
Cons:
- Having an http server for testing purposes baked into the app could be a hard sell, we wouldn’t want to accidentally ship it to the App Store!
- For the time being, the UI test runner is capable of initiating
URLSessionrequests, that however may change as there are no guarantees provided by testing framework about the behavior of the test runner app. It’s been working thus far, let’s hope it carries on!
Interesting Side Effects
An interesting side effect of utilizing live reset is how the UI tests suddenly become a memory leak detector! Keeping the app alive between test cases means any leaks will reside and build up throughout the entire test run and eventually may cause some random crashes.
This actually presents a great opportunity to add some basic tooling to check for leaks and report them proactively (e.g. a weak references array of core components that should be empty on reset).
Mitigating Risk
Many of the techniques described come with some level of risk, as we could be polluting our app with test scaffolding code that we wouldn’t want to ship.
To mitigate this, we could ensure we have some compile time protection by wrapping all the reset code with #if DEBUG statements. To keep things manageable, we would need to minimize the surface area of our reset code to avoid littering #if DEBUG statements everywhere.
Another “safer” option is to perhaps create a dedicated “Sample” application target which includes all the additional test scaffolding while keeping our main application untouched. This does require the core logic of our app to reside within independent frameworks so they can be included by both application targets. The nice thing about this option is that we’re not restricted to just the one sample application, we can create as many as we need based on functionality. This can work really well for larger applications that are managed by multiple teams.
Conclusion
With a bit of creativity we’re able to optimize a small aspect of how our UI tests can run, it may not be for all projects but is certainly worth a try.
Happy testing!