Safe Area Insets
Overview
The safe area API was first introduced back in WWDC 2017 in iOS 11 as a replacement for the deprecated topLayoutGuide and bottomLayoutGuide properties on UIViewController. Up till then, those deprecated properties were used to support extended layouts. Typically used to ensure our views weren’t obscured by any translucent top or bottom bars added by UIKit container view controllers such UINavigationController and UITabBarController.

It wasn’t till the iPhone X launch later that year that the true motivation behind the new API came to light. In addition to the top and bottom bars, we now have to account for the rounded corners and the sensor housing (aka the notch). With potential obstructions on all sides, a more versatile API was needed.
That is exactly what the safe area API offered! UIView now has two new properties safeAreaLayoutGuide (for auto layout) safeAreaInsets (for manual layout). The fact those properties are on UIView is a much welcomed addition, as now each view can manage its layout without the need to have the view controller propagate the appropriate insets down to the views or worse, have the views reference the view controller to pull them out!.
That said, the safe area API has some oddities in behaviour which don’t appear to be well documented (at least non that I could find), especially when it comes to child view controller views.
The short version
The behaviour of safeAreaInsets actually varies based on the view type, size and location in the hierarchy:
- For standalone views (i.e. ones not managed by a view controller), their
safeAreaInsetswill update based on their position in relation to their superview’s bounds andsafeAreaInsets - For view controller views however (e.g. child view controller views), their
safeAreaInsetsremain fixed or “frozen”

- In the event the view controller’s view is initially offset at the time of adding it to the view hierarchy, the insets remain zero up till the point the view offset is reset to zero (i.e. aligned with the screen):


- However, if the child view controller’s view size is smaller than the screen, the insets starts behaving like the standalone view:
- Lastly, child view controller’s view
safeAreaInsetscan outgrow their superview, even when the view controller’saddtionalSafeAreaInsetsis zero!
Setup
To explore how the safeAreaInsets behave in those different situations and reproduce the results above, we’ll need to setup a small test environment.
Safe Area Test View
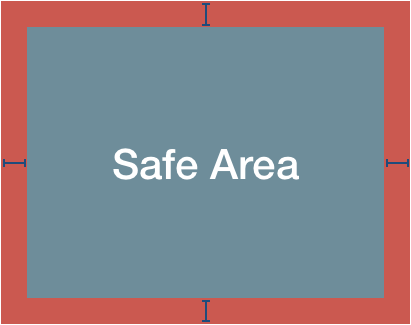
We’ll be using a UIView subclass to help us visualize the safeAreaInsets which has:
- A red background color
- A blue subview that is pinned to the
safeAreaLayoutGuide - A label to display the
safeAreaInsetsvalue
class SafeAreaTestView: UIView {

    let safeAreaLabel = UILabel()

    override init(frame: CGRect) {
        super.init(frame: frame)

        let safeAreaView = UIView()
        addSubview(safeAreaView)
        safeAreaView.anchor(to: safeAreaLayoutGuide)

        safeAreaLabel.numberOfLines = 0
        addSubview(safeAreaLabel)
        safeAreaLabel.anchor(to: safeAreaLayoutGuide)

        safeAreaLabel.textColor = .lightGray
        safeAreaView.backgroundColor = .blue
        backgroundColor = .red
    }

    override func safeAreaInsetsDidChange() {
        super.safeAreaInsetsDidChange()
        safeAreaLabel.text = "\(safeAreaInsets)"
    }

    // ...
}

// ...

private extension UIView {
    func anchor(to layoutGuide: UILayoutGuide) {
        translatesAutoresizingMaskIntoConstraints = false
        NSLayoutConstraint.activate([
            leadingAnchor.constraint(equalTo: layoutGuide.leadingAnchor),
            topAnchor.constraint(equalTo: layoutGuide.topAnchor),
            trailingAnchor.constraint(equalTo: layoutGuide.trailingAnchor),
            bottomAnchor.constraint(equalTo: layoutGuide.bottomAnchor),
        ])
    }
}
I’ll be using a similar view but with minor color and text formatting adjustments to make the screenshots a little more presentable.
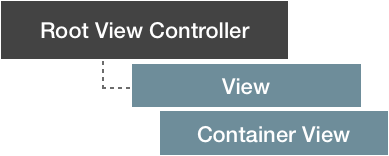
Root View Controller
We’ll then need a simple view controller which hosts a container view and a UISlider that controls its position:
class RootViewController: UIViewController {

    // ...

    var containerView: UIView!
    func setupContainers() {
        containerView = UIView(frame: view.bounds)
        containerView.autoresizingMask = [.flexibleWidth, .flexibleHeight]
        view.addSubview(containerView)
    }

    // ...

    func setupControls() {
        let slider = UISlider()
        slider.minimumValue = -100
        slider.maximumValue = 100
        slider.addTarget(self,
                         action: #selector(didUpdateOffset(_:)),
                         for: .valueChanged)

        slider.translatesAutoresizingMaskIntoConstraints = false
        view.addSubview(slider)
        NSLayoutConstraint.activate([
            slider.leadingAnchor.constraint(equalTo: view.safeAreaLayoutGuide.leadingAnchor),
            slider.trailingAnchor.constraint(equalTo: view.safeAreaLayoutGuide.trailingAnchor),
            slider.bottomAnchor.constraint(equalTo: view.safeAreaLayoutGuide.bottomAnchor)
        ])
    }

    @objc func didUpdateOffset(_ sender: UISlider) {
        let offset: CGFloat = CGFloat(sender.value)
        var frame = containerView.frame
        frame.origin.y = offset
        containerView.frame = frame
    }
}
Experiments
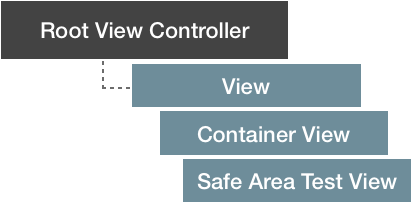
Standalone view
For our first experiment, we’ll be adding the SafeAreaTestView as a subview of the container view.
class RootViewController: UIViewController {

    // ...

    func setupTest() {
        let safeAreaView = SafeAreaTestView(frame: containerView.bounds)
        safeAreaView.autoresizingMask = [.flexibleWidth, .flexibleHeight]
        containerView.addSubview(safeAreaView)
    }
}
Then we’ll use the slider to offset the containerView’s position and examine the test view.
We’ll notice that:
- When increasing the view’s y coordinate, the top safe area insets keep decreasing till they reach zero
- The bottom safe area inset on the other hand remains fixed as the bottom edge of the view goes out of bounds
- Similar results are obtained the other way too when decreasing the y coordinate
The behaviour here looks normal and is expected based on the safeAreaInsets documentation:
… For other views in the view hierarchy, the insets reflect only the portion of the view that is covered. For example, if a view is entirely within the safe area of its superview, the edge insets in this property are 0.
It doesn’t explicitly call out that the insets become fixed for the edge of the view that goes out of bounds, but that seems reasonable.
Child view controller view
Next, we’ll repeat the same experiment, but instead we’ll have the test view be the root view of a view controller subclass.
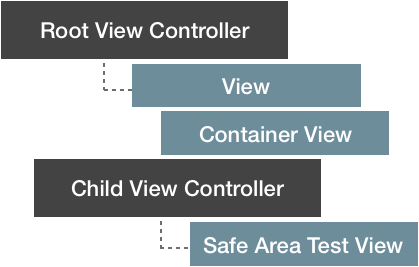
class ChildViewController: UIViewController {
    override func loadView() {
        view = SafeAreaTestView()
    }
}
This view controller can then be added as a child of our RootViewController:
class RootViewController: UIViewController {

    // ...

    func setupTest() {
        let childViewController = ChildViewController()
        embed(child: childViewController, in: containerView)
    }

    func embed(child: UIViewController, in view: UIView) {
        addChild(child)
        child.view.frame = view.bounds
        child.view.autoresizingMask = [.flexibleWidth, .flexibleHeight]
        view.addSubview(child.view)
        child.didMove(toParent: self)
    }
}
We’ll notice a slight difference in behaviour here:
- The
safeAreaInsetsremain fixed or “frozen” regardless of the view’s position
This is where the odd behaviour starts, and where the safeAreaInsets documentation becomes a little foggy:
For the view controller’s root view, the insets account for the status bar, other visible bars, and any additional insets that you specified using the additionalSafeAreaInsets property of your view controller.
Unless we take it literally?
… the insets account ONLY for the status bar, other visible bars …
Initially offset view
This time, we’ll have the container view already offset before adding our ChildViewController’s view to the hierarchy.
    // ...

    let initialOffset: CGFloat = 50.0
    func setupContainers() {
        containerView = UIView(frame: view.bounds.offsetBy(dx: 0, dy: initialOffset))
        containerView.autoresizingMask = [.flexibleWidth, .flexibleHeight]
        view.addSubview(containerView)
    }

    // ...
We’ll notice another interesting behaviour:
- The
safeAreaInsetsstart out as zero - They remain zero even while the container’s bounds start intersecting the “unsafe” area
- The
safeAreaInsetsfinally update upon the offset reaching zero - The insets then get frozen again
Smaller view
Making the ChildViewController’s view smaller by making the containerView smaller will yield a different result:
    // ...

    let heightDelta: CGFloat = -50.0
    func setupContainers() {
        var frame = view.bounds
        frame.size.height += heightDelta
        containerView = UIView(frame: frame)
        containerView.autoresizingMask = [.flexibleWidth, .flexibleHeight]
        view.addSubview(containerView)
    }

    // ...
- The behaviour now reverts back to that of the standalone view
Out of bounds view
For our final experiment, the goal is to test out the behaviour while the views go out of bounds but not off screen. We can achieve this by creating another view to host our containerView and have that view be inset within the RootViewController’s view.
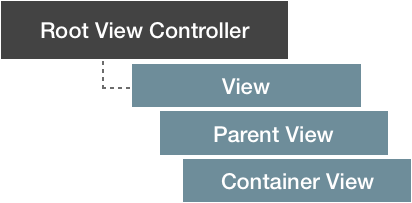
Adding some sort of border will help us visualize the parent’s bounds.
    // ...

    let containerParentInset = UIEdgeInsets(top: 30, left: 0, bottom: 30, right: 0)
    var containerParentView: UIView!
    var containerView: UIView!
    func setupContainers() {
        let parentFrame = view.bounds.inset(by: containerParentInset)
        containerParentView = UIView(frame: parentFrame)
        containerParentView.autoresizingMask = [.flexibleWidth, .flexibleHeight]
        containerParentView.layer.borderColor = UIColor.purple.cgColor
        containerParentView.layer.borderWidth = 2.0
        view.addSubview(containerParentView)

        containerView = UIView(frame: containerParentView.bounds)
        containerView.autoresizingMask = [.flexibleWidth, .flexibleHeight]
        containerParentView.addSubview(containerView)
    }

    // ...
This yields yet another inconsistency in behaviour when comparing the the standalone view (labelled as “subview” in the screenshots above) with the ChildViewController’s view side by side:
- The standalone view’s
safeAreaInsetsstop updating or “freeze” for the edge that is going out of bounds - While the
ChildViewController’s viewsafeAreaInsetscontinue to update even after it’s out of bounds
What’s really interesting here is the fact that the ChildViewController’s view can have safeAreaInsets that are greater that its superview, even while its additionalSafeAreaInsets is zero!
Conclusions
It’s unclear if this behaviour is intended or a bug in the safe area API. Searching around, I found two open radars on this topic:
- 36070764: SafeAreaInsets not updating correctly on childViewControllers
- 34426568: SafeAreaInsets not updating on UIContainerView child VC
The best mental model I can come with for the current behavior is:
- For standalone views:
safeAreaInsetsare based on the view’s location in relation to its superview, and its superview’s insetssafeAreaInsetsare frozen for the edge of the view that goes out of bounds
- For view controller managed views
safeAreaInsetsare based on the view’s initial locationsafeAreaInsetsof all edges are frozen once the view goes off screen (superview bounds are ignored it seems)
I could see the use for freezing safeAreaInsets when it comes to animating views on and off screen, as you probably wouldn’t want the content to shift internally too during that time. Perhaps a better approach here would be to extend the API to allow controlling this behaviour.
You may have noticed me using the term “frozen” throughout this post, this is because it appears to be the term found in the UIKit private headers 🙂.
Even with all these inconsistencies, I still have high hopes for this API as it’s a far superior and cleaner API than its predecessors. The ability to set custom safe areas (via additionalSafeAreaInsets on UIViewController) is fantastic! It allows us to create our own container view controllers with translucent views and achieve a similar effect to those found within UIKit.
Please reach out or comment if you have further insights on this.