Skipping Tests in Xcode
Overview
It’s that time of year where we get to play with the latest APIs in the beta versions Xcode, try out all the new shiny APIs as well as make sure our apps continue to work with the existing APIs. it’s both an exciting and somewhat interesting time.
As the name suggests, the beta versions of Xcode and operating systems are just that, they are beta versions and may come with bugs included. Some of which may cause some of our tests to genuinely fail, and may require us to to temporarily disable those tests while those bugs are resolved.
In this post, we’ll explore a number of different techniques we can use to disable or skip tests in Xcode, more specifically we’ll be looking into how we can skip tests based on the OS or Xcode version in use.
Backstory
Recently, while running our test suite using Xcode 12 beta 4, we uncovered an iOS 14 beta bug. Typically around this time, our CI is configured to run against both a release version of Xcode (e.g. Xcode 11.5) as well as the latest beta (e.g. Xcode 12 beta 4) to ensure our code is compatible with both.
This left us with a puzzling choice now that some of the tests fail on Xcode 12 beta:
- Add a temporary workaround for the bug to get the tests passing again
- Temporarily disable those tests and remember to re-enable them when the next beta is released
In this particular case, writing a workaround isn’t worthwhile (yet) as we hope this will get fixed in an upcoming beta, as such we’re left with temporarily disabling those failing tests.
This got me thinking, is there a way for us to skip tests based on a specific version of Xcode? Such that when we update to the next beta, the tests would automatically stop getting skipped.
Disabling Tests
Tempting Options
One temptation could be to comment out the failing test all together:
// func test_betaFailingTests() {
//    // ...
// }
While definitely a quick and easy option, it does come with a downside, the test code will not even be compiled. Depending on how long the test remains commented out, the code could evolve in a way that results in the test method no longer compiling in the future when it eventually gets uncommented.
Another temptation could be to rename the test method:
func disabled_test_betaFailingTests() {
   // ...
}
XCTest only runs test methods that have a test prefix, as such renaming to anything else will result in that test no longer getting run. This approach does at least allow the code to benefit from compilation, however will no longer be run or recognised as a test on any version of Xcode.
It’s best those options be avoided where possible in favor of some of the other options listed in this post.
Disabling tests via Xcode
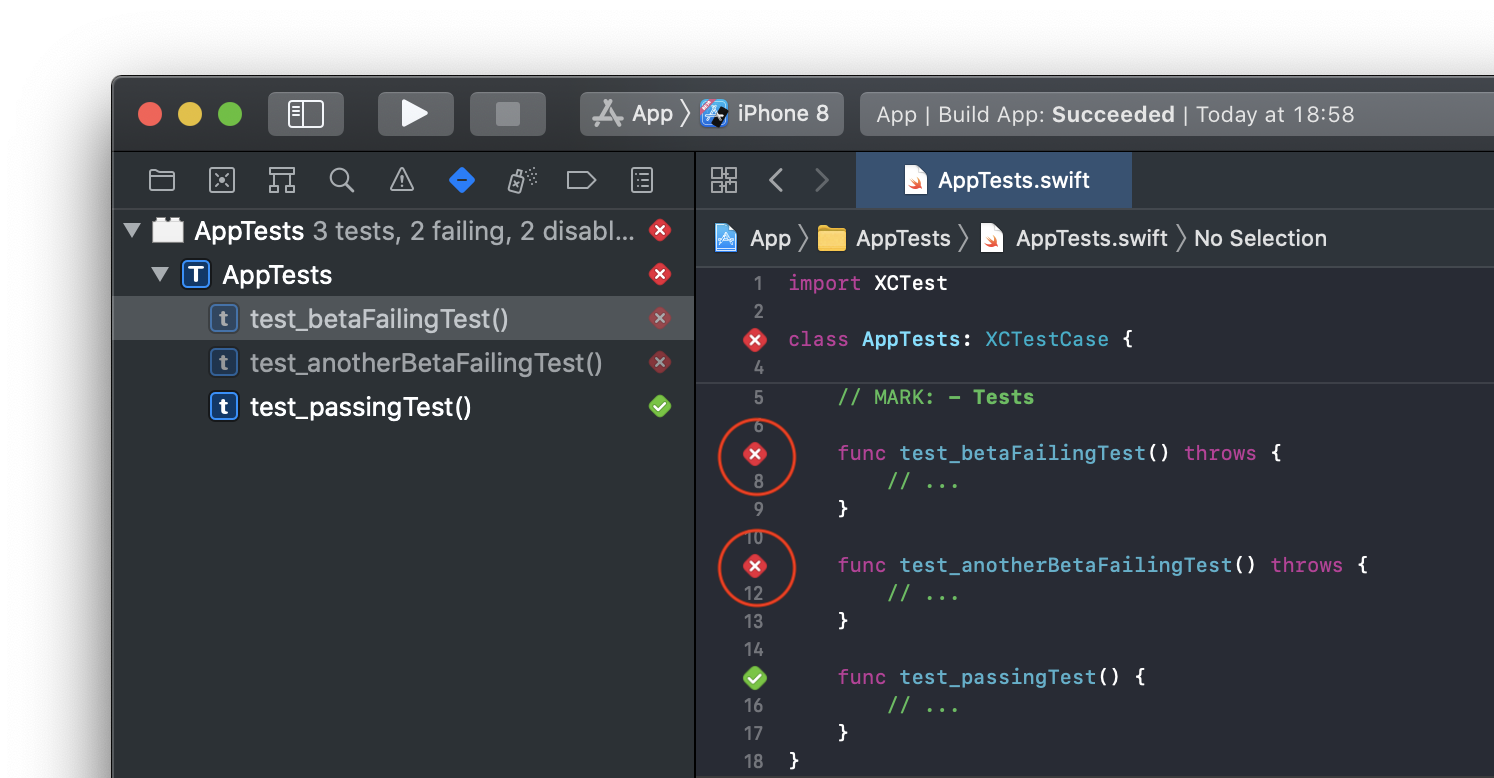
Xcode has a built in mechanism that allows you to selectively disable tests without resorting to any code changes.
This can be achieved by right clicking on the test name in the test inspector and selecting the “Disable” option.
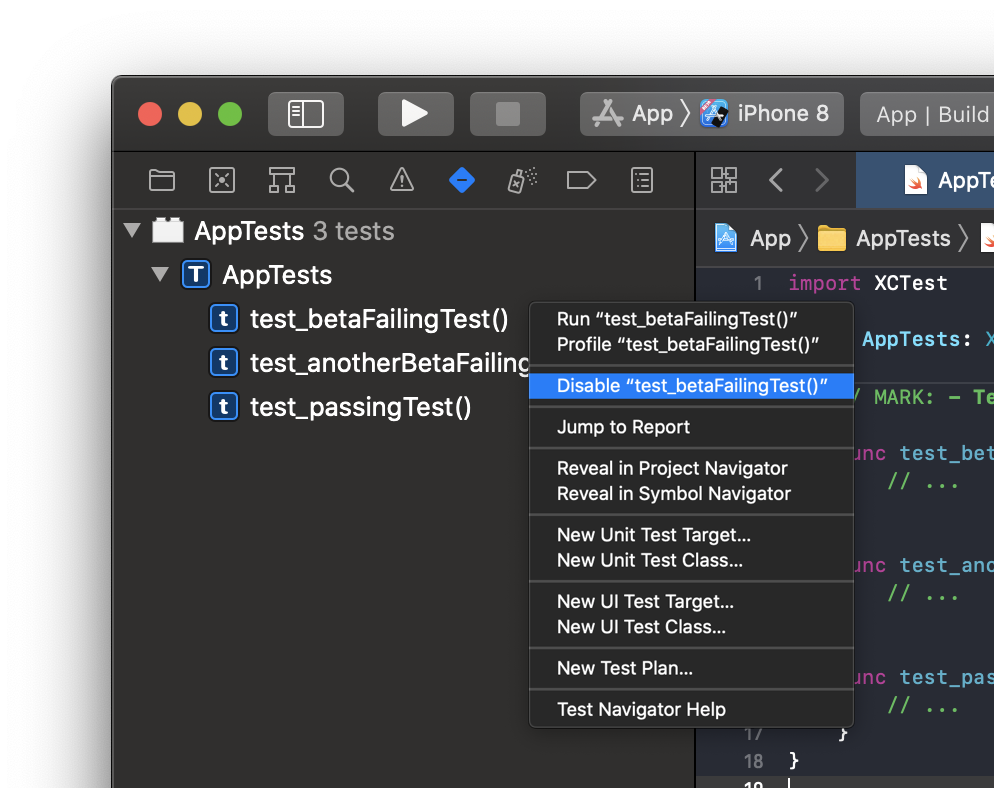
This marks those tests within the selected scheme or test plan as disabled and subsequently they will be excluded when running the entire test suite. One benefit of this approach over the previous options is that even while excluded from the test suite, disabled tests can still be individually run from within the editor in Xcode when needed.
Dedicated Schemes
While we can’t conditionally mark tests as disabled within a scheme, we can still leverage them to do so by creating different schemes, one for the release version of Xcode and another for the beta.
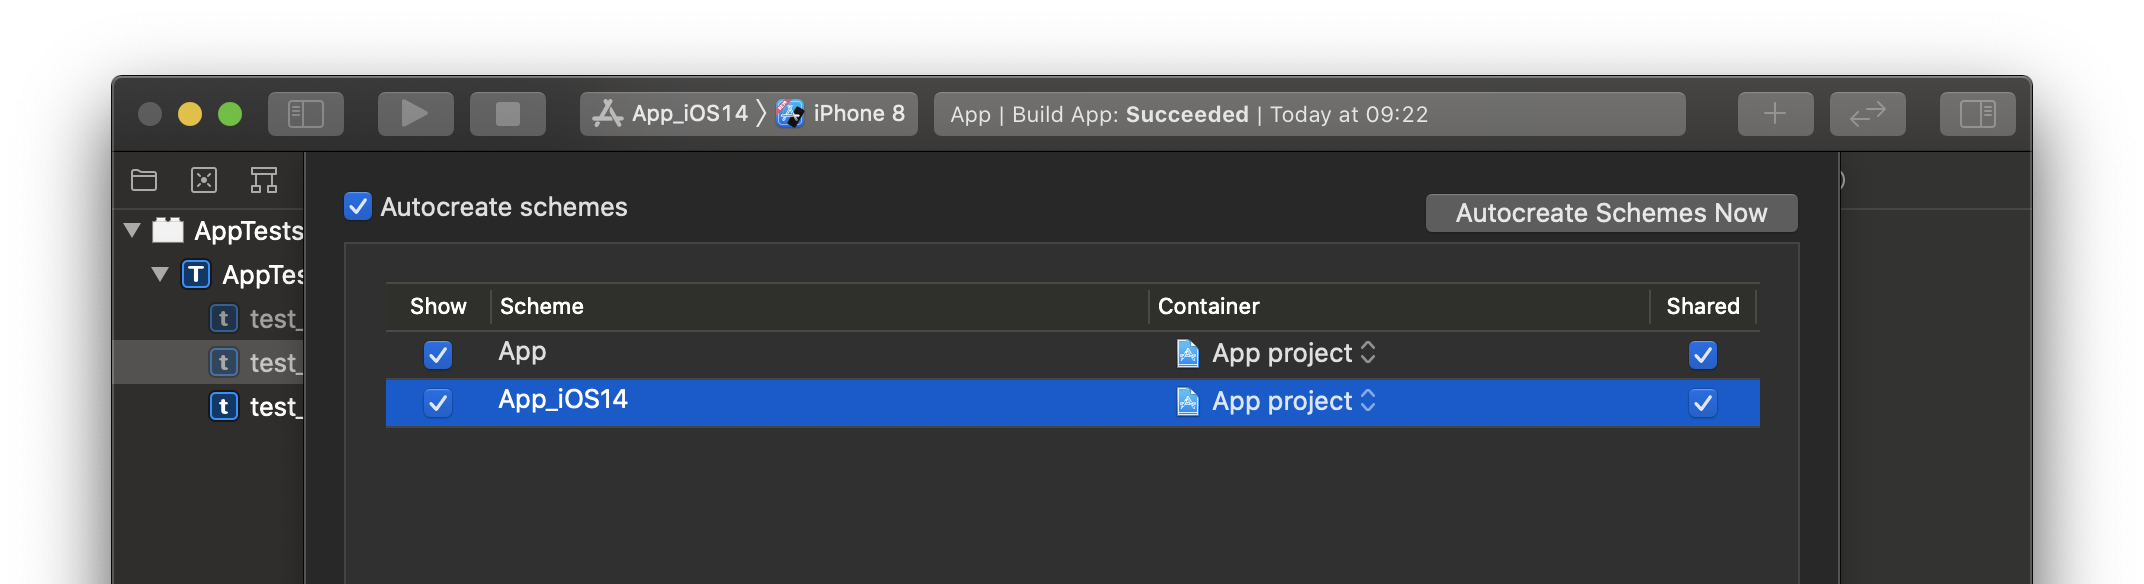
Where we only mark the tests as disabled within the beta scheme.
Then on our CI we can use the appropriate scheme based on Xcode version in use:
# When using Xcode 11
$ xcrun xcodebuild test \
  -scheme App  \
  -destination 'platform=iOS Simulator,OS=latest,name=iPhone 8'
# When using Xcode 12 beta
$ xcrun xcodebuild test \
-scheme App_iOS14 \
-destination 'platform=iOS Simulator,OS=latest,name=iPhone 8'Dedicated Test Plans
An alternate to managing multiple schemes is to leverage multiple test plans. As of Xcode 11, Xcode supports more advanced configuration customisations for tests know as test plans. A scheme can have one or more test plans associated with it.
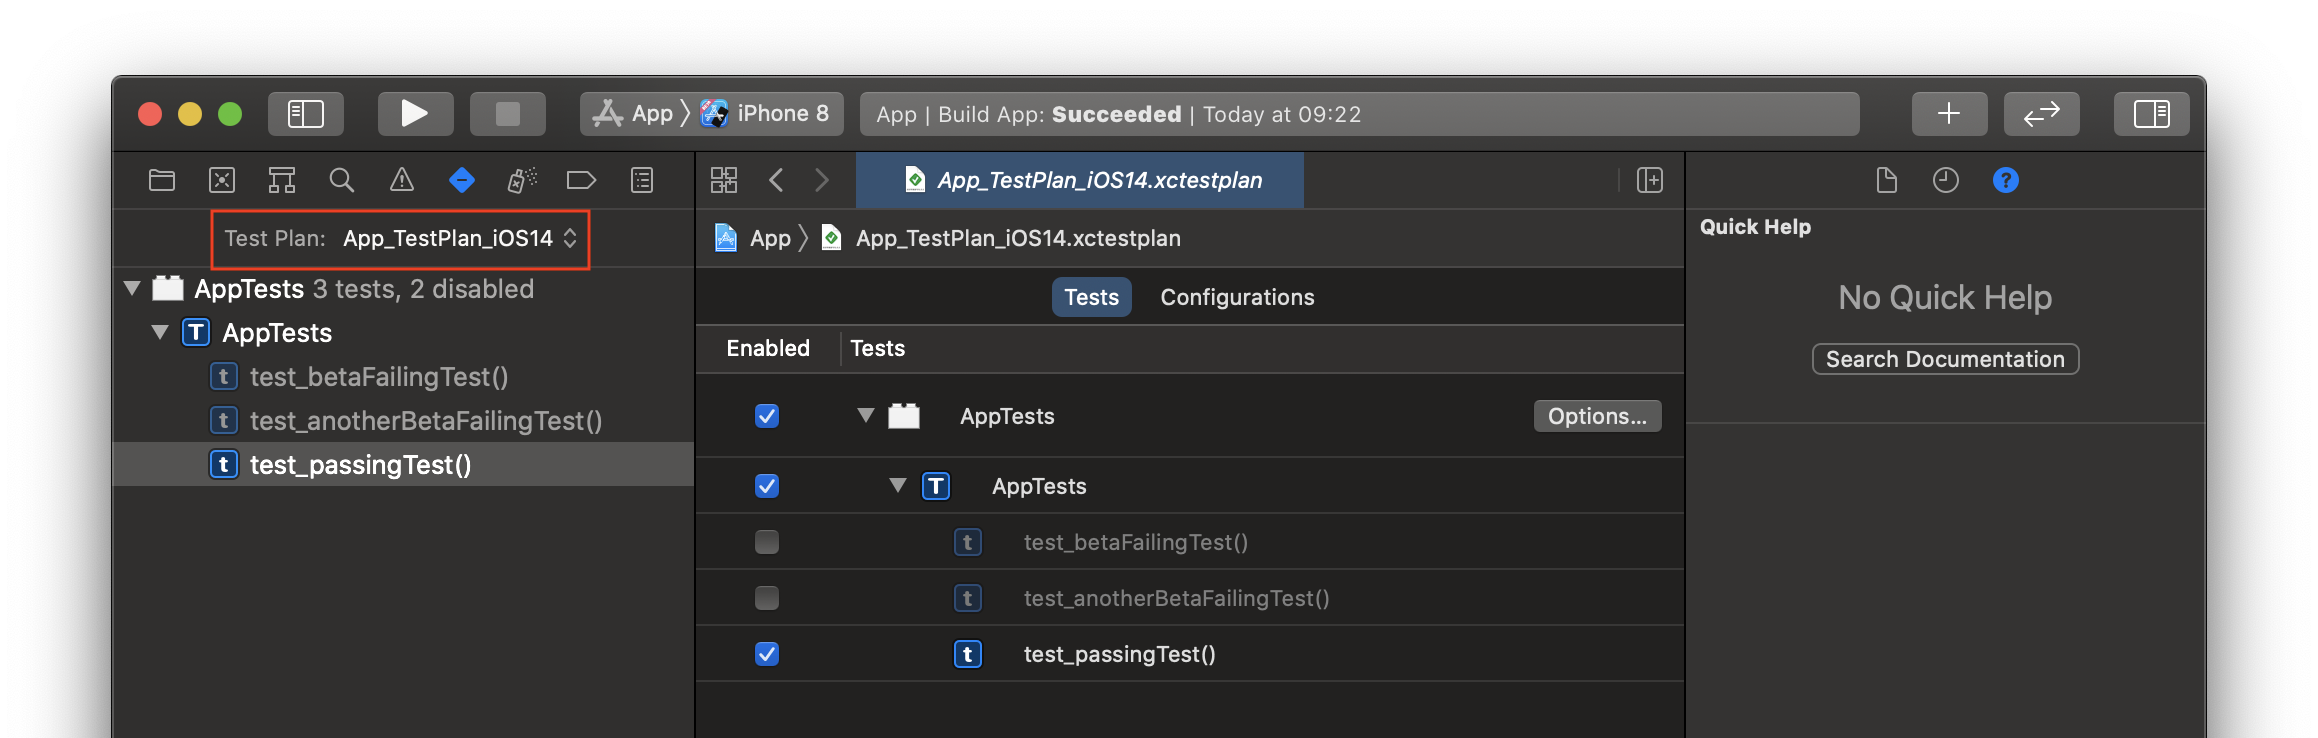
We can create a test plan dedicated to iOS 14 beta testing.
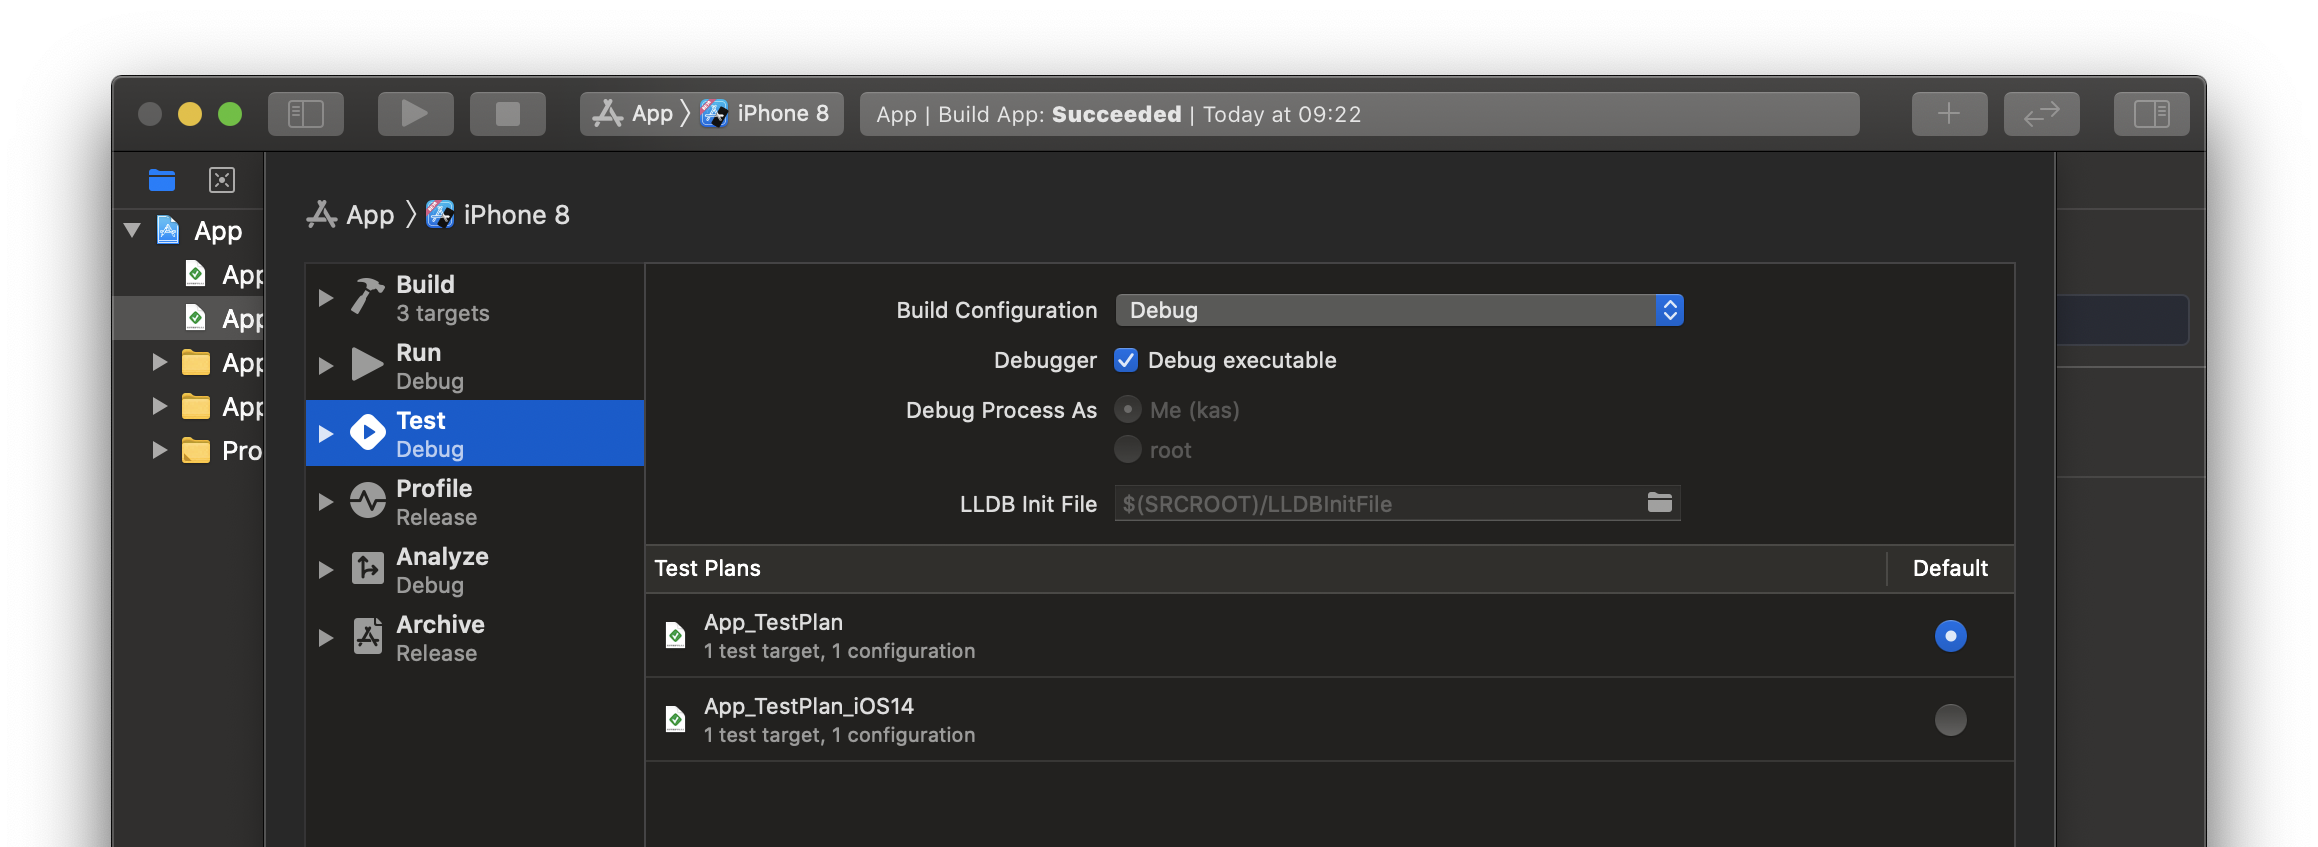
Tests can then be marked as disabled within that test plan via the test inspector, or even directly in the test plan itself (make sure to take note of which test plan is selected):
Then on our CI we can use the appropriate test plan based on Xcode version in use:
# When using Xcode 11
$ xcrun xcodebuild test \
  -scheme App  \
  -testPlan App_TestPlan \
  -destination 'platform=iOS Simulator,OS=latest,name=iPhone 8'
# When using Xcode 12 beta
$ xcrun xcodebuild test \
-scheme App \
-testPlan App_TestPlan_iOS14 \
-destination 'platform=iOS Simulator,OS=latest,name=iPhone 8'Skipping Tests
Skipping via Command Line
Another option available to us that doesn’t require maintaining multiple schemes or test plans is to leverage the -skip-testing command line option when using xcodebuild.
It takes the form of:
-skip-testing:”<TestTargetName>/<TestClassName>/<TestName>”For example:
# When using Xcode 12 beta
$ xcrun xcodebuild test \
  -scheme App  \
  -destination 'platform=iOS Simulator,OS=latest,name=iPhone 8' \
  -skip-testing:"AppTests/AppTests/test_betaFailingTest" \
  -skip-testing:"AppTests/AppTests/test_anotherBetaFailingTest"
This will result in those tests getting skipped on the Xcode 12 CI job only, however will continue to run on other CI jobs as well as locally in Xcode.
Skipping at Runtime
In Xcode 11.4, XCTSkip , XCTSkipIf and XCTSkipUnless were introduced to allow skipping tests at runtime.
func test_skipMe() throws {
   throw XCTSkip("Skipping this test")
   // ...
}

func test_skipIf() throws {
   try XCTSkipIf(someConditionIsTrue(), "Skipping this test")
   // ...
}

func test_skipUnless() throws {
   try XCTSkipUnless(someConditionIsFalse(), "Skipping this test")
   // ...
}
It’s worth watching this year’s WWDC’s XCTSkip your tests video for more details.
Skipping Based on OS Version
We could leverage the new skipping feature to conditionally skip based on OS version.
For example:
final class AppTests: XCTestCase {
    func test_betaFailingTest() throws {
        try skipIfiOS14()
        // ...
    }
}

extension XCTestCase {
   func skipIfiOS14() throws {
      if #available(iOS 14, *)  {
         throw XCTSkip("Skipping test on iOS 14")
      }
   }
}
Skipping Based on Swift Compiler Version
Along the same lines, we could also skip based on Swift compiler version.
extension XCTestCase {
    func skipIfSwift53Compiler() throws {
        #if compiler(>=5.3)
            throw XCTSkip("Skipping test on Swift 5.3 compiler")
        #endif
    }
}
This can sometimes be handy in the event the issue causing the tests to fail relates to a specific compiler version as opposed to a specific iOS version (e.g. Running the test built with Xcode beta on an iOS 13 simulator would also fail). Xcode 12 beta has a new Swift compiler version 5.3, this can allow us to distinguish between it and Xcode 11.
Skipping based on Xcode Version
Going back to the scenario we faced, we would like to temporarily skip the test for a particular Xcode beta version, and not for iOS 14 or the Swift 5.3 compiler forever more … in fact it would be great if it gets re-enabled automatically next time we update Xcode.
We’d like something along the lines of:
final class AppTests: XCTestCase {
    func test_betaFailingTest() throws {
        try skipIf(xcodeVersion: "12.0-beta4")
        // ...
    }
}
Finding the Xcode Version
As it happens, the information we’re after is already included within the Info.plist of our test target. Xcode by default includes a few additional keys at compile time to the final plist file that gets embedded within the built product (the .xctests bundle).
We can inspect the contents of the plist file to see for ourselves:
defaults read /path/to/DerrivedData/AppTests.xctests/Info.plistThe .xctests bundle can be located by right clicking on the test target under the Products group in Xcode and selecting Reveal in Finder.
Note: for unit tests with host applications, the .xctests bundle is embedded within the host application.
defaults read /path/to/DerrivedData/App.app/PlugIns/AppTests.xctests/Info.plistWe should see something similar to this:
{
    BuildMachineOSBuild = 19E287;
    CFBundleDevelopmentRegion = en;
    CFBundleExecutable = AppTests;
    CFBundleIdentifier = "net.testing.AppTests";
    CFBundleInfoDictionaryVersion = "6.0";
    CFBundleName = AppTests;
    CFBundlePackageType = BNDL;
    CFBundleShortVersionString = "1.0";
    CFBundleSupportedPlatforms =     (
        iPhoneSimulator
    );
    CFBundleVersion = 1;
    DTCompiler = "com.apple.compilers.llvm.clang.1_0";
    DTPlatformBuild = 18A5342e;
    DTPlatformName = iphonesimulator;
    DTPlatformVersion = "14.0";
    DTSDKBuild = 18A5342e;
    DTSDKName = "iphonesimulator14.0";
    DTXcode = 1200;
    DTXcodeBuild = 12A8179i;
    MinimumOSVersion = "13.0";
    UIDeviceFamily =     (
        1,
        2
    );
}
Notice two interesting keys, DTXcode and DTXcodeBuild:
    DTXcode = 1200;
    DTXcodeBuild = 12A8179i;
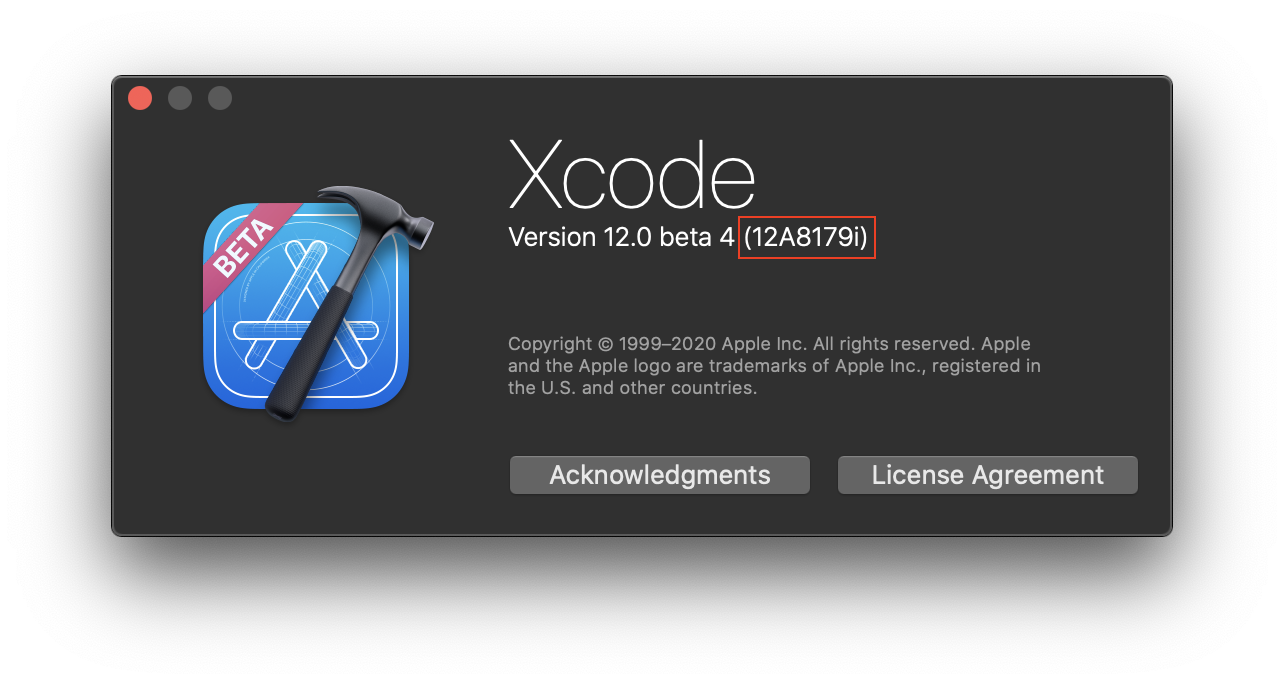
While we do not have the beta number per se, the DTXcodeBuild (build version) value is unique to each Xcode version including beta versions. This can be found in Xcode’s about screen:
Or from the command line:
$ xcrun xcodebuild -version
Xcode 12.0
Build version 12A8179i
Accessing the Xcode Version at Runtime
We can access values from our Info.plist file at runtime via bundle.object(forInfoDictionaryKey:)
func currentXcodeBuildVersion() -> String? {
   class BundleFinder { }
   let bundle = Bundle(for: BundleFinder.self)
   return bundle.object(forInfoDictionaryKey: "DTXcodeBuild") as? String
}
Final Results
Piecing together what we have so far, we can write a small helper method to skip based on a specific Xcode version:
extension XCTestCase {
    func skipIf(xcodeVersion: String) throws {
         guard let currentVersion = currentXcodeBuildVersion() else {
            return
        }
        try XCTSkipIf(xcodeVersion == currentVersion, "Skipping test, Xcode build version is \(xcodeVersion)")
    }
}
Instead of dealing with string versions, we can tidy things up a bit by creating an XcodeVersion enum that helps us map them to their semantic versions:
enum XcodeVersion: String {
   // ...
   case xcode12_beta4 = "12A8179i"
}

extension XCTestCase {
    func skipIf(xcodeVersion: XcodeVersion) throws {
        guard let currentVersion = currentXcodeBuildVersion() else {
            return
        }
        try XCTSkipIf(xcodeVersion == currentVersion, "Skipping test, Xcode build version is \(xcodeVersion)")
    }

    func currentXcodeBuildVersion() -> XcodeVersion? {
        class BundleFinder { }
        let bundle = Bundle(for: BundleFinder.self)
        let versionString = bundle.object(forInfoDictionaryKey: "DTXcodeBuild") as? String
        return versionString.flatMap {
            XcodeVersion(rawValue: $0)
        }
    }
}
And we finally end up with the following at the call site:
final class AppTests: XCTestCase {
    func test_betaFailingTest() throws {
        try skipIf(xcodeVersion: .xcode12_beta4)
        // ...
    }
}
Side Notes
First Attempt
At first I didn’t realise that the DTXcodeBuild key was already included in the final Info.plist file, it’s not till I started preparing this blog post and explaining the methodology that I discovered it. This is one of the great things about blogging or presenting topics publicly, it encourages you to research that topic further to help explain it better, and by doing so you actually end up learning more about said topic!
For completeness, here was my initial approach to obtaining the Xcode build version (for the next few paragraphs, let’s pretend DTXcodeBuild doesn’t exist).
Is the Xcode build version available to us at build time? To answer this question, we can inspect all the build settings available and their resolved values via:
$ xcrun xcodebuild -showBuildSettings -target AppTestsThis will flood our console (there’s a fair bit of build settings!), we can either use grep to filter through or store the output in a file and browse it in our favourite editor.
Inspecting the build settings, we can see a few Xcode related settings:
$ xcrun xcodebuild -showBuildSettings -target AppTests | grep -i xcode_
    # ...
    XCODE_PRODUCT_BUILD_VERSION = 12A8179i
    XCODE_VERSION_ACTUAL = 1200
    XCODE_VERSION_MAJOR = 1200
    XCODE_VERSION_MINOR = 1200
This is quite useful as we can reference any of those build settings in our test target’s Info.plist:
<?xml version="1.0" encoding="UTF-8"?>
<!DOCTYPE plist PUBLIC "-//Apple//DTD PLIST 1.0//EN" "http://www.apple.com/DTDs/PropertyList-1.0.dtd">
<plist version="1.0">
  <!-- ... -->
  <key>CurrentXcodeBuildVersion</key>
   <string>$(XCODE_PRODUCT_BUILD_VERSION)</string>
</plist>
When compiling our test target, Xcode will evaluate the Info.plist file and embed a version with the final resolved values within the built .xctests bundle product.
We can inspect the evaluated plist as we previously did:
defaults read /path/to/DerrivedData/AppTests.xctests/Info.plist

{
    ...
    CurrentXcodeBuildVersion = 12A8179i;
}
We’ve already seen how to access those values at runtime.
bundle.object(forInfoDictionaryKey: "CurrentXcodeBuildVersion") as? StringAlas we don’t need to jump through those hoops as DTXcodeBuild is automatically set for us.
Skipping Based on Other Custom Data
If you find yourself needing to skip tests based on other environmental conditions at runtime, you can leverage the same Info.plist technique used above and pass your own custom data.
<?xml version="1.0" encoding="UTF-8"?>
<!DOCTYPE plist PUBLIC "-//Apple//DTD PLIST 1.0//EN" "http://www.apple.com/DTDs/PropertyList-1.0.dtd">
<plist version="1.0">
  <!-- ... -->
  <key>CustomKey</key>
   <string>$(MY_CUSTOM_KEY)</string>
</plist>
MY_CUSTOM_KEY can then be set directly in Xcode’s build settings editor as a user defined setting, or in an .xcconfig file, or even specified via the command line:
$ xcrun xcodebuild test \
  -scheme App  \
  -destination 'platform=iOS Simulator,OS=latest,name=iPhone 8' \
  MY_CUSTOM_KEY="CustomValue"
Closing Thoughts
What started out as curious exploration of the question “Can we skip tests based on a specific Xcode version?”, turned into this longish post on a number of different ways one can disable or skip tests in Xcode.
I hope you find this useful, happy testing!